
Ethereum: Guide for beginners after the Bitcoin chart
As an Ethereum enthusiast, it is necessary to understand the basics of the cryptocurrency market. One of the key aspects is the study of charts that can ensure valuable insight into the coin performance. Today we will delve into the world of Ethereum and examine what every component represents.
Basic review
Ethereum (ETH) is an open source blockchain platform that allows you to create decentralized applications (DAPPS). The cryptocurrency has gained immense popularity over the years, and its price has increased rapidly in recent months. As such investors, they always look for charts and indicators to assess market moods.
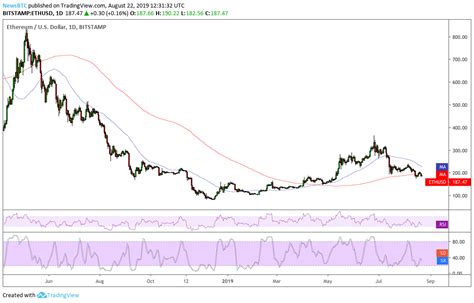
Bitcoin chart: comparative perspective
Before we immerse ourselves to Ethereum, it is necessary to read the Bitcoin (BTC) chart. The Bitcoin chart serves as a comparative guide to analyze the performance of other cryptocurrencies such as Ethereum. Here’s what each belt represents on the chart:
* Hills and falls : These posts represent high prices and falls of cryptocurrencies.
+ High: The highest point achieved by the coin during its trend up.
+ Low: the lowest point reached by the coin during its trend down.
* Horizers of support and resistance : These lines are key when determining whether the price movement will be maintained or inverted. Support levels represent areas in which the buyers gathered, while the resistance levels represent areas in which sellers exceeded prices.
* Trend lines
: Trend lines follow the direction of asset prices. They can help identify trends and predict future price changes.
Ethereum chart components
Now that you know the components of the Bitcoin chart, let’s get to Ethereum:
- Candles : Candles on the Ethereum chart represent closing prices for each period (e.g. day, time, minute). Each candle has a unique color:
* Green represents a stubborn trend.
* Red Represents bear.
* Black indicates no price change (dormitory).
- Belts : Stripes on the Ethereum chart represent the volume of rotation for each period. Each bar usually consists of three sections:
* Body : The main body of the bar, representing the commercial amount.
* Wick 1 : The first part of the belt, starting with the opening price and ending at a low/low level.
* Wick 2 : The second part of the belt, starting with high/high.
- STOCHASKA oscillator : This indicator helps to identify carved or sold out conditions. Consists of two lines:
* signal line (mobile average 14-speed): the line above/below 50% shows stubborn/bear.
* CROSSOVER (movable average 8-speed): crossing between signal and resistance levels indicates the potential possibility of purchase/sales.
yellow line
The yellow line represents
Relative strength indicator (RSI) , which is a momentum indicator. Higher RSI value usually indicates carved conditions, while the lower value suggests sold out conditions.
- 50: average price level.
- 70-80: Condition of purchase (purchase).
- 30-50: Neutral condition (balance).
- 0-30: Sale condition (sale).
green and red bits
These two colors represent
Medium movable :
- Green: short-term movable average (usually 50-speed) is above the long-term average movable (usually 200-speed).
+ Stubborn trend.
- Red: short -term movable average is below the long -term movable average.
+ Trend Bear.
In summary, understanding the Ethereum charts and their components can help in making informed investment decisions. By studying these charts, you will be better prepared to move around the cryptocurrency market and identify potential profit possibilities.